I still remember standing in my first studio apartment kitchen, holding a cast iron skillet in one hand and a box of pasta in the other, completely stumped about where either of them was supposed to go. The counter was already full. The cabinets were a Jenga tower of mismatched lids and forgotten appliances. And the drawer? Don’t even get me started on the drawer.
If you’ve ever lived in a tiny kitchen, you know that feeling. It’s not just inconvenient — it’s genuinely stressful. Cooking stops being fun when you’re playing a game of spatial Tetris every single time you need to make dinner.
But here’s the thing: after a few years of trial, error, and way too many trips to IKEA, I figured out some seriously effective tricks that made my small kitchen feel almost roomy. And most of them cost little to nothing.
Here are 11 hacks that actually worked for me — and can work for you too.
1. Mount a Magnetic Knife Strip (and Never Use a Knife Block Again)
A knife block sitting on your counter is basically a space thief. It takes up a solid chunk of prime real estate and holds maybe 5–6 knives you probably don’t use equally.
A magnetic knife strip mounted on the wall? It holds everything vertically, keeps your knives visible and accessible, and frees up counter space instantly.
I mounted mine on the side wall next to my stove using two screws. Total cost: around $15 on Amazon. Total counter space reclaimed: a significant chunk that now holds my cutting board standing upright in a plate rack (more on that in a sec).
Pro tip: Don’t limit it to knives. Magnetic strips also hold metal kitchen tools like scissors, peelers, and even small tins of spices if you put them in magnetic containers.
2. Use the Inside of Cabinet Doors — Seriously, It’s Wasted Space
Open your cabinet door right now. What do you see on the inside? Probably nothing.
That blank surface is basically a free shelf you’ve been ignoring. I added small adhesive hooks on the inside of my cabinet door under the sink for dish gloves and a small brush. On pantry cabinet doors, I added a thin over-the-door organizer that now holds my oils, vinegars, and spice packets.
You can find these door-mounted organizers on Amazon or at The Container Store. Look for ones with adjustable shelves so you can customize them to your cabinet height.
This one change alone added what felt like two extra shelves to my kitchen without drilling a single hole in the wall.

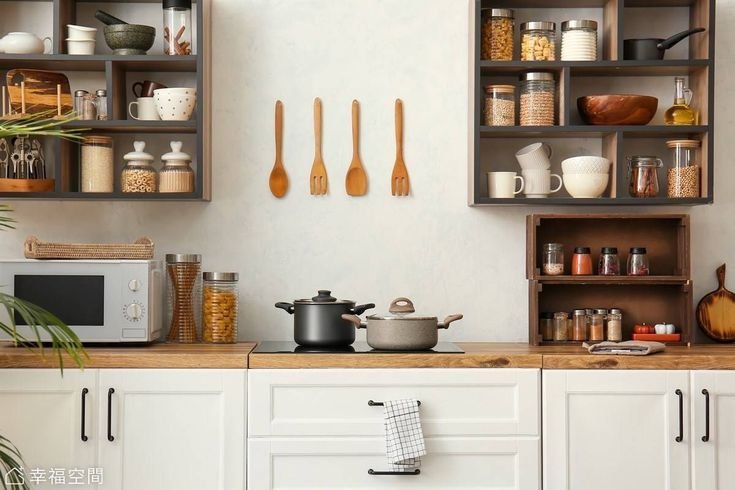
3. Go Vertical With a Pegboard
I was honestly skeptical about pegboards. They felt like something out of a garage workshop, not a kitchen. But after seeing a friend’s tiny Brooklyn apartment kitchen with a pegboard covering almost an entire wall, I was completely converted.
A pegboard lets you hang pots, pans, utensils, small baskets, and even a paper towel holder — all off your counter and walls. You can rearrange the hooks and baskets whenever your needs change. It’s endlessly customizable.
IKEA’s SKÅDIS pegboard system is one of the best options. It comes in different sizes and the accessories are affordable. I mounted a 22×22 inch one next to my stove, and it now holds my six most-used pans, a row of utensils, and a small basket where I keep garlic and shallots.
For more ideas on how to use wall space smartly, check out these 9 secret tiny kitchen living storage ideas using wall space — they gave me a bunch of additional inspiration when I was setting mine up.
4. Nest and Stack Everything You Can
One of the biggest space mistakes I made early on was storing things in the same shape they came in. Bulky pots stacked randomly, mixing bowls in a disorganized pile, random lids scattered everywhere.
The fix? Nest everything intentionally.
- Mixing bowls should nest inside each other from largest to smallest
- Pots and pans should nest with their handles aligned
- Lids should be stored separately in a vertical lid organizer (a simple wire file holder from the office supply section works perfectly)
- Food storage containers should be stored with lids off and stacked, lids stored in a separate small bin
This took me one afternoon to reorganize and I genuinely couldn’t believe how much more cabinet space I suddenly had. It’s not about buying new storage — it’s about being intentional with what you already have.
5. A Rolling Cart Is Your Best Friend
This is probably the single most life-changing purchase I made for my tiny kitchen. A small rolling kitchen cart (sometimes called an island cart) gives you:
- Extra counter space when you need it
- Extra storage underneath (mine has a shelf and a small drawer)
- Mobility — you can roll it out when cooking and tuck it away or into a corner when you’re done
I found mine at IKEA (the RÅSKOG is great for smaller spaces, the BEKVÄM if you want a more solid wood surface). It now lives next to my fridge and holds my coffee station on top, with basket storage underneath for snacks and kitchen linens.
If your kitchen has even a tiny bit of adjacent hallway or dining area space, a rolling cart basically gives you a bonus kitchen zone.
6. Rethink Your Fridge Top and Sides
The top of your fridge is prime storage real estate, especially in a tiny kitchen. But most people either leave it empty or pile random stuff up there without any organization.
I put a slim storage bin on top of my fridge that now holds cereal boxes and crackers — things that take up cabinet space but don’t need to be temperature controlled. Just make sure whatever you store there is lightweight and in a container so it doesn’t fall.
The sides of your fridge are often overlooked too. Magnetic spice racks and magnetic paper towel holders can attach right to the side panel of most fridges. This moved three things off my counter immediately.
7. Switch to Stackable, Uniform Food Containers
This one felt a little extra when I first heard it, but the difference it makes is dramatic.
Most of us accumulate food storage containers from different brands over years — random sizes, shapes, lids that don’t match. They’re impossible to stack efficiently.
Switching to one uniform set of stackable containers (I use OXO Good Grips and Rubbermaid Brilliance — both fantastic) transforms your pantry and fridge storage. Everything lines up. Everything stacks. You can suddenly fit twice as much in the same space.
Yes, there’s a small upfront cost. But you’ll probably also find you can get rid of half your mismatched containers in the process, which is its own kind of relief.
Here’s a quick comparison of popular stackable container systems:
| Brand | Best For | Lid Style | Price Range |
|---|---|---|---|
| OXO Good Grips | Dry pantry goods | Pop-top airtight | $$$ |
| Rubbermaid Brilliance | Fridge + freezer | Snap-lock, leak-proof | $$ |
| IKEA 365+ | Budget-friendly | Tight-fitting plastic | $ |
| Cambro (restaurant supply) | Large quantities | Stackable with grip lid | $$ |
8. Store Cutting Boards Vertically, Not Flat
Flat-stored cutting boards take up a huge amount of cabinet shelf space. The solution is embarrassingly simple: store them vertically, like books on a shelf.
You can use a simple metal file organizer (the kind meant for folders), a plate rack, or a dedicated board organizer. All of these hold cutting boards upright, which means they take up maybe a quarter of the horizontal space they used to.
I now store my three cutting boards (yes, I have three — one for meat, one for produce, one for bread) in a single file organizer that sits in a cabinet corner. That freed up almost an entire shelf.

9. Hang a Tension Rod Under the Sink
The cabinet under the sink is notoriously awkward — pipes in the way, weird depth, nothing stacks nicely. But a simple tension rod (the same kind used for shower curtains) changes everything.
Hang the tension rod horizontally inside the cabinet and use S-hooks or small baskets to hang spray bottles, cleaning supplies, and even rubber gloves. Suddenly the space that was a black hole becomes organized and usable.
I also added a small adhesive shelf on the side wall inside that cabinet for sponges and dish soap — no drilling required, just a Command strip shelf.
This whole setup cost me about $8 total and took fifteen minutes.
10. Use a Over-the-Sink Dish Rack or Drying Mat
A traditional dish rack sitting next to the sink occupies precious counter space 24/7, even when you’re not drying anything.
Two alternatives that work much better in tiny kitchens:
Option A: An over-the-sink dish rack that bridges across your sink basin. Dishes dry directly over the sink; water drips straight down. No counter footprint at all. Brands like KitchenEdge and Surpahs make solid ones for around $30–45.
Option B: A microfiber drying mat that rolls up when not in use. You lay it flat when drying dishes, then roll or fold it away. Takes up almost zero storage space.
I switched to the drying mat approach and reclaimed a solid section of counter I now use as my primary prep space. It genuinely changed how my kitchen felt to work in.
For more clever ideas like this, these 7 smart tiny kitchen living cooking hacks that save time are worth reading through — some of them I still use every single day.
11. Declutter Ruthlessly (The Tools You Don’t Use Are Just Taking Space)
I saved this one for last because it’s the most uncomfortable — but also the most impactful.
Take everything out of your kitchen. Every drawer, every cabinet, every shelf. Lay it all out.
Now look at it honestly. The egg slicer you’ve used twice. The giant wok that doesn’t fit on your burner. The bread maker still in its box. The fourth spatula.
Most of us are storing a lot of stuff we don’t actually use, and in a tiny kitchen, those items are directly taking space from things that actually improve your daily cooking.
My rule: if I haven’t used something in 3 months and it doesn’t serve a specific seasonal purpose (like a holiday roasting pan), it goes. Donated, sold, or tossed.
After my first full kitchen declutter, I found I only really needed about 60% of what I had. That 40% reduction in stuff created more space than any organizational product I could have bought.
This connects directly to a mindset shift I found in these 11 easy tiny kitchen living storage tricks I wish I knew earlier — sometimes the best storage solution is just owning less stuff to store.
Common Mistakes I Made (So You Don’t Have To)
Buying storage products before decluttering: I did this backwards at first. I bought bins, organizers, and racks — then tried to fit my existing stuff into them. Wrong order. Declutter first, then organize, then buy only what fills a specific gap.
Over-organizing: Yes, this is a thing. I spent an entire weekend labeling every container with a label maker and color-coding my pantry. It looked amazing for about ten days, then real life happened. Keep systems simple enough that you’ll actually maintain them.
Ignoring vertical space: Counters and floor space are naturally limited in tiny kitchens. Everything you can move up — onto walls, on top of appliances, onto mounted racks — frees up the surfaces where you actually work.
Keeping duplicate tools: Two garlic presses, three can openers, four wooden spoons. Pick the best one of each and let the rest go.
One Last Thing
Small kitchens have a way of forcing creativity that bigger kitchens never require. Some of my best cooking habits — mise en place, cleaning as I go, keeping only the tools I truly love — came directly from the constraints of having almost no space.
A tiny kitchen isn’t a problem to solve once and forget. It’s an ongoing practice of being intentional about what you own and where it lives. But with the right hacks in place, you’d be surprised how much a 60-square-foot kitchen can actually do.
Start with one hack this weekend — maybe the magnetic knife strip, maybe the under-sink tension rod — and see how it changes the way you feel in your kitchen. Small wins add up fast.
Also worth reading: 8 Secret Tiny Kitchen Living Cooking Habits That Save Counter Space — a few of these habits completely changed how I approach meal prep in a small kitchen.