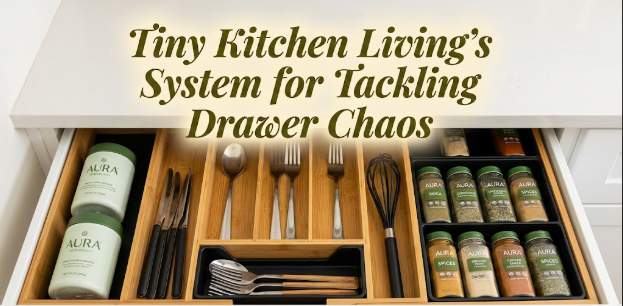
Drawer chaos is not a storage problem.
It’s a decision problem, and the difference matters enormously when you’re working with two or three drawers in a 10-by-8 kitchen.
I’ve been designing small kitchens for twenty-four years, and the drawer situation is one of the first things I assess when I walk into a new client space. Not because drawers are the most complex feature of a kitchen, but because they reveal everything about how the space is actually being used. Cluttered drawers almost always point to a breakdown in the decision process, not a shortage of space. And in a small kitchen, that distinction is the whole ballgame.
The system I’ve refined and shared through Tiny Kitchen Living isn’t about buying better organizers, though we’ll get there. It starts earlier than that.
- Why Drawers in Compact Kitchens Keep Failing You
The standard advice for drawer organization usually sounds like this: buy a bamboo insert, sort your utensils by type, keep it tidy. Clean enough advice, except it skips the actual cause of the problem.
Small kitchen drawers fail for three predictable reasons.
First, they’re often shallow, typically under four inches deep, which means items can’t stand upright and tend to stack against the drawer face when you try to open it. Second, they absorb everything that has no other logical home. Keys, takeout menus, twist ties, a single birthday candle from two apartments ago. This happens fast and quietly. Third, nobody ever made a clear category decision about what the drawer was actually for.
That third point drives the real chaos. A drawer without a defined purpose becomes a catch-all, and in a small kitchen, one drawer going off-script displaces items into the others because there’s nowhere else for them to migrate.
Depth isn’t the constraint. Ambiguity is.

- The Sort Step (Which Is Not the Same as Organizing)
Empty all the drawers. Completely. Everything goes onto a flat surface, all of it, even the things you forgot were in there.
I know how counterproductive that sounds when counter space is the resource you’re fighting to protect. But this step only needs to happen once, and doing it halfway is exactly what produces the halfway results most people end up with.
Sorting and organizing are not the same step. Sorting means deciding what belongs in the kitchen at all, which category each item falls into, and whether it genuinely earns a drawer. Organizing is what happens after those decisions are made. If you skip sorting and jump straight to “how do I arrange this more neatly,” you’re rearranging the problem rather than solving it.
Separate everything into three groups:
Daily use. What you reach for every single day. A spatula or two, your most-used knife, a peeler if you cook vegetables regularly, the can opener you actually use. In a studio kitchen cooking for one or two, this pile is usually smaller than people expect.
Occasional use. Monthly or seasonal tools. A grater, a citrus press, skewers, that pastry tool you pull out three times a year. Genuinely useful, just not daily.
Homeless items. Things that live in the drawer because they had nowhere else to go. Batteries, rubber bands, menus, mystery keys. This pile tends to be larger than people expect, and it’s the group that deserves the most scrutiny.
Daily use items go back in the drawer. Occasional items find a different home: a cabinet shelf, a wall hook, a basket tucked into a cabinet. Homeless items get relocated entirely. A small zipper pouch stored in a cabinet handles most of the random-small-item problem without sending it back to contaminate the drawers.
This step alone, before you spend a single dollar, will transform how your drawers function.
- Assigning Zones: What Actually Goes Where
Once sorted, the question becomes which items belong in which drawer. In standard kitchen design, we talk about proximity to function, utensils near the prep zone, pot holders near the stove. In a tiny kitchen where everything sits 18 inches from everything else, those rules need recalibrating.
The real goal isn’t proximity. It’s that your hand reaches the right drawer before your brain finishes the thought.
Here’s a zone framework that works in kitchens with two to three drawers:
Drawer PositionAssign ToKeep OutPrimary (nearest prep area)Daily utensils, most-used knivesAnything used less than once a weekSecondary (near stove or appliances)Pot holders, tongs, ladleGadgets, seasonal toolsThird drawer (if you have one)Measuring cups, occasional toolsRandom non-kitchen itemsNo third drawerSolve storage through other meansDon’t compress everything into two drawers
That last row matters more than it looks. If you only have two drawers, the solution is not to force everything in. It’s to accept that some items need a non-drawer solution, and there are good ones. The Kitchen With No Drawers: What Works Instead piece covers the practical alternatives directly, and most of them apply equally well to kitchens with two drawers trying to function like four.
Zone assignment is what makes a system feel automatic after a few weeks. When the category matches the location, retrieval stops being a search task.
- Choosing Organizers That Fit Your Actual Drawer
This is where the spending happens. And where, honestly, a lot of money gets wasted.
The most popular kitchen drawer organizers, the large bamboo inserts with pre-set sections, are sized for standard 24-inch deep drawers in full-size kitchens. They’re genuinely well-designed for that purpose. But the shallow, narrow drawers in studio apartments and older rental kitchens are a different category. Drop a large bamboo tray into a 14-inch deep drawer and you’ll spend the next six months fighting the contents every time you try to close it.
A side note that always surprises people: some of the best small-drawer organizers come from bathroom organization sections, not kitchen sections. Bathroom products run smaller, the compartment formats are closer to what tiny kitchen drawers actually need, and they’re often cheaper. A 3-by-5 bin sold for organizing cotton rounds works perfectly for corralling small, irregular kitchen tools. I realize that sounds like a strange detour, but it’s a consistently practical one and worth knowing before you spend $40 on a kitchen-branded product that doesn’t fit.
What specifically works in small, shallow drawers:
Tension rod dividers. Drop them in at whatever width you need, no tools, no adhesive, no commitment. They create clean lane separation for flat items like spatulas and tongs. Easy to reposition, forgiving of uneven interior surfaces, and inexpensive enough that experimenting with placement costs nothing.
Small plastic bins (2 to 3 inch width). Cluster like items together without the bulk of a full insert. A few bins in a small drawer give you category zones without wasting space on pre-set compartment sizes that don’t match what you actually own.
Low-sided bins for rolled or upright storage. A silicone pastry brush and a small whisk are awkward in flat compartments, they tip, slide, and tangle. A low bin where they stand loosely upright keeps them accessible without the constant frustration.
The common mistake is buying a complete organizer set and then trying to make your drawer conform to the product. Buy for the specific dimensions of your drawer, not for what the product looks like in the listing photo. If you’re still deciding between drawer organizers and shelf-based solutions for your storage gaps, the Shelf Risers vs Drawer Organizers: Which Helps More comparison is worth reading before spending anything.
- How the System Breaks Down (And How to Stop It)
The system breaks at the intake point. Every time.
A new utensil comes in. There’s no clear category home for it. So it goes in the most accessible drawer. Then another tool. Then a gadget someone gave you that seemed useful at the moment. Within two months, the drawer is back to where it started before the sort.
This is the maintenance problem, and I find it more useful to name it directly than to pretend the sorting step creates a permanent fix. In a small kitchen, the margin for intake without a matching exit is nearly zero.
The fix is a one-in-one-out rule, applied the same day the new tool arrives. Not this week. That day. The replaced item exits the drawer, either relocated or removed. It takes about 45 seconds and it keeps the system from quietly resetting itself.
A monthly 10-minute drawer check handles everything else. Open each drawer, confirm the contents still match the assigned category, remove anything that wandered back into the homeless pile. Ten minutes is maintenance. The 45-minute full sort is a one-time reset. That distinction matters for whether people actually maintain it long-term.
Tiny Kitchen Living covers the ongoing storage maintenance question in Small Kitchen Storage Ideas Worth Testing in 2026, which is a useful companion for the longer-term upkeep side of things.
One more thing worth naming: people organize vertically in drawers when they need to organize laterally. Stacking items means the thing you need is always under something else. Lateral organization, items placed in clear lanes side by side, means everything is visible in one glance when you open the drawer. Shallow drawers actually enforce this well. You can’t stack much in four inches of depth. Which means a properly sorted shallow drawer is often more functional than a deep one full of stacked items nobody can see.
Depth was never the point. Visibility was.
Frequently Asked Questions
- My kitchen only has two small drawers. Can this system actually work for me?
Yes, but with two drawers the selection criteria for what earns a spot has to be strict. Daily-use utensils only, full stop. Everything else gets solved through other means: wall hooks, a small counter organizer, cabinet shelving. Two well-sorted drawers outperform four chaotic ones in every practical measure. For how to make the rest of your storage equation work, the Tiny Kitchen Living Starter Guide to Cabinet Storage covers the broader approach.
- Do I really have to empty everything out at once? It feels overwhelming.
For the initial reset, yes. Trying to sort while items are still in the drawer means you’re working around the problem rather than seeing it clearly. The full empty-out approach takes 30 to 45 minutes once, then maintenance from there is much shorter. The reason most drawer reorganization attempts don’t stick is because people skip this step.
- What should I do with a junk drawer in a tiny kitchen?
A designated junk drawer is a luxury that only works when you have enough drawers to spare. In a tiny kitchen, you probably don’t. Replace it with a small zipper pouch stored in a cabinet for random small items like batteries, twist ties, and rubber bands. That preserves the practical function without giving a full drawer over to miscellany.
- How do I organize drawers that are uneven or from an older apartment?
Tension rod dividers are the most forgiving option for irregular interiors because they don’t need a flat, perfectly squared surface to function. Adhesive organizers can also work if you add a thin foam strip underneath to fill small gaps in uneven wood. Avoid tight friction-fit inserts in older drawers because they shift constantly and make the problem feel worse than before you started.
- Should I label the drawer sections after organizing them?
Inside labels, small adhesive labels on the front interior of each section, are helpful during the first couple of months while the habit is forming. They’re especially useful in shared kitchens where more than one person is using the drawers. Once the locations become automatic, you can remove them or leave them. The goal is for the category to become obvious enough that you stop needing the label at all.
For a broader look at storage systems built for small spaces, the full archive at Tiny Kitchen Living covers everything from cabinet organization to counter strategies: https://tinykitchenliving.org/tiny-kitchen-livings-starter-guide-to-cabinet-storage/